As a trusted supplier of HTHP (High Temperature High Pressure) Dyeing Machines, I understand the importance of a seamless installation process. An efficient installation not only ensures the smooth operation of the machine but also maximizes its lifespan and performance. In this blog post, I will guide you through the step - by - step process of installing an HTHP Dyeing Machine.
Pre - installation Preparations
Site Selection
The first step in installing an HTHP Dyeing Machine is to choose an appropriate site. The location should have a flat and stable floor that can support the weight of the machine. It is recommended to have a solid concrete floor with a load - bearing capacity of at least [X] kg per square meter. The area should be well - ventilated to dissipate heat and fumes generated during the dyeing process. Adequate space around the machine is also necessary for easy access during operation, maintenance, and repairs. A clearance of at least [X] meters on all sides is advisable.
Utility Requirements
Before installing the machine, make sure that all the necessary utilities are available at the site. This includes a reliable power supply. The HTHP Dyeing Machine typically requires a three - phase electrical connection with a voltage of [X] volts and a frequency of [X] Hz. Ensure that the electrical circuit is properly grounded to prevent electrical hazards.
Water is another essential utility. You need a continuous supply of clean water with a sufficient flow rate and pressure. The water should be free from impurities such as sand, dirt, and chemicals that could damage the machine. A water softening system may be required if the local water supply has a high mineral content.
In addition, a proper drainage system is needed to dispose of the wastewater generated during the dyeing process. The drainage pipes should be large enough to handle the volume of water and should be connected to a main sewer or a wastewater treatment facility.


Machine Inspection
Once the site is ready, carefully inspect the HTHP Dyeing Machine upon arrival. Check for any visible damage during transit, such as dents, scratches, or loose parts. Compare the components with the packing list to ensure that all the parts are included. If you find any issues, contact the shipping company and our customer service team immediately.
Installation Steps
Unloading and Positioning
Use appropriate lifting equipment, such as a forklift or a crane, to unload the HTHP Dyeing Machine from the transport vehicle. Make sure to follow the correct lifting points specified in the machine's manual to avoid damage. Once unloaded, carefully move the machine to its designated position on the prepared site. Use a level to ensure that the machine is perfectly horizontal. Any unevenness can cause vibration during operation, which may lead to premature wear and tear of the machine's components.
Connecting the Pipes
The next step is to connect the water, steam, and dyeing liquor pipes. Start by connecting the water inlet pipe to the machine. Use high - quality pipes and fittings that are resistant to corrosion and high pressure. Make sure all the connections are tight to prevent leaks.
The steam supply pipe is also crucial as steam is used to heat the dyeing liquor to the required temperature. Connect the steam pipe to the steam inlet of the machine, and install a pressure regulator to control the steam pressure.
The dyeing liquor pipes are used to circulate the dye solution within the machine. Connect these pipes according to the machine's piping diagram, ensuring proper alignment and tight connections.
Electrical Wiring
Electrical wiring should be done by a qualified electrician. Follow the electrical schematic provided in the machine's manual to connect the power cables, control wires, and sensors. Make sure all the wires are properly insulated and secured to prevent short - circuits. Install a suitable circuit breaker and overload protection device to safeguard the machine and the electrical system.
Control System Setup
The control system of the HTHP Dyeing Machine is the brain of the operation. It allows you to set the temperature, pressure, time, and other parameters for the dyeing process. Connect the control panel to the machine's main control unit and power it on. Follow the startup procedure in the manual to initialize the control system. Calibrate the sensors, such as the temperature and pressure sensors, to ensure accurate readings.
Testing and Commissioning
Leak Testing
After all the connections are made, conduct a leak test. Fill the machine with water and pressurize the system to the normal operating pressure. Check all the pipe connections, valves, and joints for any signs of leakage. If you find a leak, tighten the connection or replace the faulty component.
Function Testing
Once the leak test is successful, perform a function test of the machine. Start the machine and run it through a test cycle without any fabric. Check if all the components, such as the pumps, heaters, and agitators, are working properly. Monitor the temperature, pressure, and flow rate to ensure they are within the specified range.
Dyeing Test
After the function test, conduct a dyeing test with a small batch of fabric. Follow the recommended dyeing recipe and process parameters. Observe the dyeing results, including the color uniformity, penetration, and fastness. Make any necessary adjustments to the process parameters based on the test results.
Our Product Range
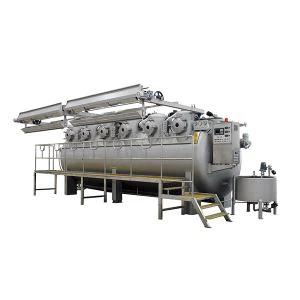
We offer a wide range of HTHP Dyeing Machines to meet different customer needs. Our High Temperature Fabric Dyeing Machine is designed for high - quality fabric dyeing at high temperatures. It features advanced technology and precise control systems to ensure excellent dyeing results.
For those who need to dye coral fleece or coral velvet, our HTHP Jet Dyeing Machine For Coral Fleece Coral Velvet is the perfect choice. It is specifically engineered to handle the unique properties of these fabrics, providing uniform dyeing and soft hand - feel.
Our HTHP Dual Flow Fabric Dyeing Machine offers enhanced dyeing efficiency with its dual - flow design. It can significantly reduce the dyeing time and improve the quality of the dyed fabric.
Conclusion
Installing an HTHP Dyeing Machine requires careful planning, proper preparation, and precise execution. By following the steps outlined in this blog post, you can ensure a successful installation and commissioning of the machine. If you have any questions or need further assistance during the installation process, our professional technical support team is always ready to help.
We are committed to providing high - quality HTHP Dyeing Machines and excellent after - sales service. If you are interested in purchasing our products or have any inquiries, please feel free to contact us for more information and to start a procurement negotiation.
References
- Manufacturer's Manual of HTHP Dyeing Machine
- Industry Standards for Textile Dyeing Machine Installation